
Halloween projectors have become increasingly popular in creating spooky and immersive displays for the Halloween season. These projectors are designed to project eerie and chilling images onto various surfaces, making them an essential tool for creating a spooky atmosphere during Halloween festivities.
To understand how Halloween projectors work, we need to explore their components and the technology behind them. A Halloween projector typically consists of a light source, a lens system, an image processor, and a playback device. The light source produces the light that illuminates the image, whereas the lens system helps focus and project the image onto a surface.
The image or video displayed by the projector is typically stored in a playback device, such as a USB drive or an SD card. This device is connected to the projector, which then reads and projects the images or videos. Some projectors also come with built-in memory or have the option to connect to external devices like smartphones or computers.
The image is projected onto a surface using either a standard projector, LED projector, or laser projector. Each type has its own advantages and variations in projection quality, brightness, and color accuracy. Standard projectors use traditional lamps, LED projectors utilize light-emitting diodes, and laser projectors employ laser beams to project the images.
When setting up the Halloween projector, it is important to choose the right projection surface to achieve optimal results. Flat and light-colored surfaces, such as windows or walls, work best for projection. adjusting the projector settings, such as brightness and focus, can enhance the clarity and overall effect of the projected image.
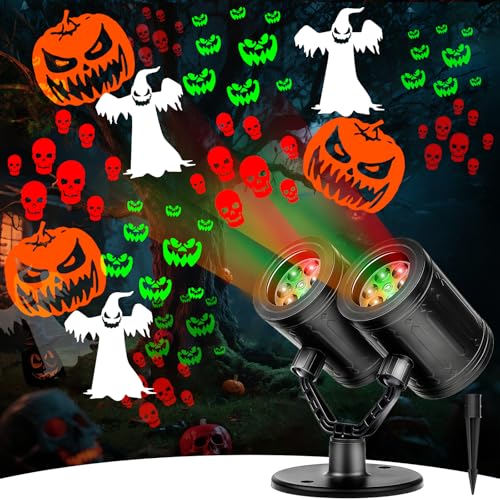
With Halloween projectors, you can create various spooky effects, from ghostly apparitions to creepy crawlies and haunted house scenes. These projectors allow you to immerse your home or outdoor space in the Halloween spirit, captivating and delighting your guests.
Setting up a Halloween projector involves positioning the projector at an appropriate distance and angle to achieve the desired projection size and focus. External audio devices can be connected to synchronize spooky sound effects with the projected images, enhancing the overall eerie ambiance.
Key takeaway:
- Halloween projectors maximize visual impact: By projecting spooky images onto surfaces, Halloween projectors create a creepy atmosphere and enhance the overall Halloween experience.
- Halloween projectors work through key components: These projectors consist of a light source, an image or video source, and a lens that projects the image onto a desired surface.
- Choosing the right projection surface and adjusting projector settings is essential: To achieve the best results, it is important to select a suitable surface and adjust the projector settings according to the desired effect.
What are Halloween Projectors?
Halloween projectors are devices that project spooky images and videos onto surfaces for Halloween decorations. They make use of advanced technology to display high-resolution images on walls, floors, or outdoor spaces. Operating them is a breeze.


Halloween projectors add a chilling atmosphere to Halloween events and parties. They project scenes such as haunted houses, ghosts, witches, pumpkins, and other eerie elements. To add to the spookiness, eerie sound effects accompany the images.
When selecting a Halloween projector, it is crucial to consider brightness and clarity. Opt for projectors with high lumens to ensure better visibility in darker environments. Assess the range and adjustability of the projector for optimal angles and coverage.
Another significant aspect to consider is the range of pre-loaded content provided. Some projectors offer a vast selection of themed images and videos, allowing users to effortlessly switch between different Halloween scenes.
How do Halloween Projectors Work?
Halloween projectors work by using a light source such as LED or laser to project images or videos onto a surface. They utilize mirrors and lenses to magnify and focus the light, creating a clear and vivid image. The projectors can be connected to a computer or media player to display a variety of visuals, enhancing the spooky atmosphere.
Settings and controls are available to adjust the brightness, color, and size of the projection. Some projectors even come with built-in sound effects or speakers, further enhancing the Halloween experience. When choosing a Halloween projector, it’s important to consider factors like image quality, brightness, and compatibility with other devices. If you plan to use the projector for outdoor displays or parties, you should also take into account its size and weight. By researching different models and considering individual preferences, you can find a Halloween projector that suits your needs and helps create a spooky atmosphere for everyone to enjoy.


What are the Components of a Halloween Projector?
The components of a Halloween projector are: the light source, projection lens, image source, projection mechanism, housing and controls, and power supply.
The light source uses a bulb or LED lights to project images. The projection lens focuses the light and shapes the projected image.
The image source can be a physical slide or a digital file stored on a USB drive or SD card, containing the images or videos to be projected.
The projection mechanism moves the image source in front of the light source and lens to project the image.
The housing and controls enclose the projector, protect internal components, and provide easy access to controls for adjusting settings.
The power supply connects to a power source to operate the Halloween projector. A pro-tip is to regularly clean the lens of the Halloween projector for optimal image quality and clarity.
How is the Image Projected?
The image is projected through a process that involves several components. First, the Halloween projector receives a video or image input through a connected device like a DVD player, laptop, or smartphone. The projector’s internal circuitry then processes the input and converts it into a format that can be displayed as an image or video.
The processed signal is then sent to the projector’s light source, typically a high-intensity lamp or LED bulb. The light source emits a strong beam of light that passes through a lens system inside the projector. The lens system focuses and shapes the light beam, allowing it to project the image onto a surface.
So, you might be wondering, how is the image projected? Well, the projected image is created by the interaction between the light beam and the surface. The surface can be a wall, screen, or any suitable surface. When the projector’s light hits the surface, it creates a visible representation of the video or image input.
The quality of the projected image depends on factors such as the resolution of the input signal, the brightness and clarity of the projector’s light source, and the characteristics of the projection surface. So, to ensure a crisp and vivid projected image for your Halloween decorations, it is important to have a high-quality input signal, use a bright and clear light source, and choose a suitable surface.
Various Types of Halloween Projectors

Photo Credits: Rickyshalloween.Com by Billy Flores
Looking to make your Halloween decorations stand out this year? In this section, we’ll dive into the world of Halloween projectors and explore the various types available. From standard projectors to LED and laser ones, we’ll uncover the unique features and effects each brings to your spooky display. Get ready to learn how these innovative devices can take your Halloween decorations to the next level, creating a hauntingly realistic ambiance that will leave your neighbors in awe.
1. Standard Projectors
Standard projectors are a fantastic option for Halloween projections with ease. These projectors have a resolution of 800×600 pixels or higher. They offer a brightness ranging from 2,000 to 3,000 lumens, ensuring clear and visible projections in dark environments. Standard projectors also have a contrast ratio of at least 10,000:1, delivering vibrant and well-defined images.
When it comes to throw distance, these projectors can project images from 8 to 15 feet, making them suitable for various room sizes and outdoor settings. They also come with HDMI, VGA, and USB ports, allowing easy connection to devices like laptops, media players, or gaming consoles.
One of the great features of these projectors is their vertical keystone correction, ensuring rectangular and proportionate image projection, even at an angle. They also support multiple aspect ratios, including 4:3 and 16:9, accommodating different content formats.
Standard projectors offer affordability and reliability, making them a top choice for captivating Halloween projections.
2. LED Projectors
LED projectors are a popular choice for Halloween decorations due to their bright display and versatility. These projectors use light-emitting diodes (LEDs) to project images and videos onto various surfaces, both indoors and outdoors. With their energy efficiency and longer lifespan, LED projectors are an excellent option for enhancing the spooky atmosphere.
When using LED projectors for Halloween, it is important to follow these suggestions to ensure optimal results. Securely position the projector to prevent accidents or damage. Select a large, smooth, and flat surface to achieve the best image quality. Adjust the projector settings to achieve the desired brightness, contrast, and color saturation. To create spooky effects, make use of Halloween-themed videos or images. Consider connecting audio for sound effects and music to enhance the overall experience.
By incorporating LED projectors into your Halloween decor, you will be able to create a memorable and immersive experience for everyone involved.
3. Laser Projectors
Laser projectors are the perfect choice for creating stunning visual effects.
Using advanced laser technology, these projectors are able to produce high-intensity beams of light that can project intricate patterns, images, and animations onto any surface with precision and clarity.
What makes laser projectors truly impressive is their ability to project images over long distances, allowing for dynamic displays that have multiple color options.
In addition, some laser projectors come with built-in features like sound activation or remote control, adding convenience and flexibility to your projection experience.
When selecting a laser projector, it’s important to consider factors such as brightness, color options, projection area size, and outdoor suitability.
It’s also crucial to follow safety guidelines and refrain from shining the laser directly into people’s eyes.
By incorporating laser projectors into your Halloween decorations, you’ll be able to create a spooky atmosphere that will leave a lasting impression on your guests.
Tips for Using Halloween Projectors
Looking to create a spooky ambiance for Halloween? Look no further! In this section, we’ve got you covered with some valuable tips for using Halloween projectors. Discover the secrets of choosing the perfect projection surface to bring your frightful scenes to life. And not to worry, we’ll also show you how to adjust the projector settings to achieve the most chilling and captivating effects. Get ready to impress your neighbors and send shivers down their spines!
1. Choosing the Right Projection Surface
Choosing the Right Projection Surface
When it comes to Halloween projectors, selecting the appropriate projection surface is essential for achieving optimal visual effects. There are several factors to consider in making this decision:
Texture: Smooth surfaces, such as walls or projector screens, are ideal for projecting crisp and clear images. It is important to steer clear of rough or uneven surfaces that may distort the projections.
Color: To ensure accurate color reproduction, it is recommended to use a neutral or light-colored projection surface. Dark surfaces tend to absorb excessive light, resulting in a dimmer image.
Size: The size of the projection surface should be suitable for the venue and desired visual impact. Determining the optimal size can be accomplished by considering the distance between the projector and the surface.
Positioning: It is crucial to position the projection surface in a way that it is easily visible to the audience. Areas with direct sunlight or excessive ambient light should be avoided.
Flexibility: When projecting onto various surfaces or objects, a portable and adjustable projection screen or fabric is highly recommended.
By selecting the right projection surface, you can enhance the effectiveness of your Halloween projector and create a more immersive and spooky atmosphere.
To illustrate this, let me share an experience from last Halloween. My friend created an eerie outdoor projection for trick-or-treaters. He utilized a large white bedsheet hung on the side of his garage as the projection surface. The smooth texture and appropriate size of the sheet allowed for clear and impressive ghostly apparitions and creepy crawlies. The lifelike projections astonished both children and parents, enhancing the overall ambiance of the haunted house scene. As you can see, choosing the right projection surface played a significant role in creating a memorable and frightful Halloween experience.
2. Adjusting the Projector Settings
Adjusting the projector settings is crucial for optimal results from your Halloween projector. Follow these steps to adjust your projector:
1. Choose the right aspect ratio: Most Halloween projectors have adjustable aspect ratios. Consult the user manual or settings menu to select the appropriate ratio for your projection surface.
2. Adjust the brightness: Depending on the lighting conditions, adjust the brightness to ensure clear and visible images. Increase the brightness for darker environments and decrease it for brighter settings.
3. Set the contrast and saturation: Experiment with these settings to find the right level of vibrancy and depth in the images. Enhance the contrast to highlight the differences between light and dark areas, and adjust the saturation to make colors more vivid or subtle.
4. Fine-tune the focus: Use the focus adjustment feature to ensure a sharp and clear image. Rotate the focus knob or use the on-screen adjustment tool until the image appears crisp and well-defined.
By following these steps, you can optimize your Halloween projector settings and create a spooky and immersive experience for your Halloween decorations.
The concept of projectors dates back to ancient times, where shadow plays were performed using candlelight to cast shadows on a screen. The modern projector was first developed in the late 19th century. The magic lantern, an early form of the projector, used a light source to project images onto a surface. Advancements in technology led to electric projectors with brighter and more efficient light sources. Today, projectors are widely used for entertainment, presentations, and creating spooky effects during Halloween.
Creating Spooky Effects with Halloween Projectors
Get ready to dive into the world of spine-chilling Halloween projectors and discover how they create the most terrifying effects. In this section, we will explore three key elements that will send shivers down your spine: ghostly apparitions, creepy crawlies, and haunted house scenes. Brace yourself for a hauntingly immersive experience as we uncover the secrets behind these spooky projections. Get ready to be thrilled beyond your wildest nightmares!
1. Ghostly Apparitions
When using Halloween projectors, you have the ability to create eerie and ghostly apparitions that will surely send chills down everyone’s spines. Here are some ideas on how to achieve this effect:
1. Bring ghostly figures to life: Utilize your Halloween projector to project images of ghostly figures onto surfaces such as walls or sheets. These figures can either float or move, giving off a truly haunting and spectral appearance.
2. Enhance the spookiness with eerie special effects: Take your ghostly projections a step further by adding in sound effects like whispers or haunting music. This combination will heighten the overall creepy atmosphere and create a more immersive experience for your guests or trick-or-treaters.
3. Play with lighting techniques: Experiment with different lighting techniques to enhance the ghostly projections. Adjusting the brightness and contrast of your projector can help create a more ethereal and otherworldly effect.
4. Add an extra layer of creepiness with fog or mist: Introduce fog or mist into the display area of your projections to intensify the ghostly apparitions. The fog will create a mystifying and chilling ambiance, making the projections even more eerie.
5. Make it interactive with the environment: Consider projecting the ghostly apparitions onto moving or reflective surfaces for a dynamic and interactive effect. For instance, projecting onto a water surface or using a fan to create movement can make the ghostly figures appear more lifelike and captivating.
By incorporating these techniques, you will be able to seamlessly create captivating and spine-chilling ghostly apparitions with your Halloween projector, guaranteeing a memorable and haunting experience for all.
2. Creepy Crawlies
Creepy crawlies can add a spine-chilling touch to your Halloween display with a projector. Here are some spooky effects you can create:
- Giant spiders: Project a scary spider crawling across your house or in a corner to frighten your guests.
- Insects swarming: Create a swarm of cockroaches or beetles crawling up your walls or across your windows.
- Slimy snakes: Make it look like a group of slithering snakes is making their way through your yard or slithering across your front door.
- Creepy bugs in a jar: Use a digital image of bugs trapped in a jar to make it seem like you have captured sinister creatures.
- Scuttling rats: Project images of rats scurrying around your garden or across your porch for a truly unsettling effect.
By using a projector and the right imagery, you can bring these creepy crawlies to life and make your Halloween display unforgettable.
3. Haunted House Scenes
Haunted house scenes are a popular choice when creating spooky effects with Halloween projectors. Here are some ideas on how to use a Halloween projector to bring your haunted house to life:
1. Ghostly Apparitions: Project floating ghosts or specters onto walls, windows, or the floor to create an eerie atmosphere. Adjust the projector settings for the right brightness and size.
2. Creepy Crawlies: Use a Halloween projector to display crawling insects or snakes in dark corners or crawling up walls. This can give your haunted house a creepy vibe.
Project scenes of haunted mansions, cemeteries, or abandoned asylums onto large surfaces to set the stage for your haunted house. This can create a chilling backdrop and transport your guests into a different world.
To set up these haunted house scenes with a Halloween projector, position the projector strategically for the desired effect. Choose a suitable projection surface, such as a blank wall or a window with a sheer curtain, for clear and crisp images. Adjust the projector settings, including brightness, contrast, and focus, to enhance the spooky visuals.
With these ideas, you can transform your home into a haunted house that will leave your guests trembling with fear. Get creative and bring your Halloween vision to life!
How to Set Up a Halloween Projector

Photo Credits: Rickyshalloween.Com by Tyler Hall
Positioning the Halloween projector just right and ensuring a seamless audio connection are key to creating the ultimate spooky atmosphere. In this section, we’ll dive into the nitty-gritty of setting up a Halloween projector. Discover expert tips and tricks that will help you position the projector for maximum impact. Plus, we’ll explore the ins and outs of connecting audio to truly elevate your haunted display. Get ready to bring your Halloween vision to life with this step-by-step guide.
1. Positioning the Projector
Positioning the projector correctly is crucial for creating optimal Halloween effects. Follow these steps for optimal positioning:
Find a sturdy surface: Place the projector on a stable surface to prevent vibrations or movement during operation.
Distance and angle: Position the projector at a distance and angle that allows the projected image to fit perfectly on the desired surface. Refer to the projector’s manual for recommended distances.
Leveling: Use a leveling tool to ensure the projector is perfectly level, avoiding any image distortion.
Avoid obstructions: Ensure there are no objects obstructing the path between the projector and the projection surface for a clear and uninterrupted image.
Keystone correction: If the projector has keystone correction, adjust the settings to correct any distortion caused by the projector’s angle, maintaining a rectangular image.
The use of projectors for Halloween decorations originated in the late 20th century. As technology advanced and projectors became more affordable, people began projecting spooky images and animations onto their homes. This tradition quickly gained popularity and is now widespread during Halloween festivities.
2. Connecting Audio
To connect audio to a Halloween projector, you need to follow these steps. First, make sure that your projector has an audio output port, such as a 3.5mm headphone jack or an HDMI port that supports audio. Next, identify the audio source you want to connect to the projector, whether it’s a computer, DVD player, or smartphone. Once you have identified the source, use the appropriate audio cable to connect the audio output of the source device to the audio input of the projector. For a 3.5mm headphone jack, use a 3.5mm audio cable. If you’re using HDMI audio, use an HDMI cable.
If you’re using a 3.5mm audio cable, plug one end into the audio output port of the source device and the other end into the audio input port of the projector. If you’re using an HDMI cable, plug one end into the HDMI output port of the source device and the other end into the HDMI input port of the projector. Make sure that the projector is set to receive audio input from the connected source by adjusting the audio settings in the projector’s menu or selecting the correct audio input source. To achieve the desired audio level, adjust the volume settings on both the source device and the projector.
Play the audio on the source device and check if it is successfully transmitted through the projector’s speakers or audio output. By following these steps, you can easily connect audio to your Halloween projector and enhance the spooky atmosphere with sound effects or accompanying music.
Frequently Asked Questions
How do Halloween projectors work?
Halloween projectors work by projecting spooky images or videos onto various surfaces, such as windows, walls, or pumpkins, to create a Halloween-themed display. They use projection technology to display high-quality digital images or videos.
What are the key features of Halloween projectors?
Halloween projectors often have features like rechargeable batteries, which make them portable and easy to use. They also have options for keystone adjustment to ensure the projected image is properly aligned. Some projectors have a built-in repeat function to loop the source material continuously.
What sources can I use for Halloween projections?
You can use various sources for Halloween projections, such as stock photo sites like Unsplash, Dreamstime, and Pixabay, which offer free scary images. There are pre-made loops specifically designed for Halloween decorations, such as those offered by AtmosFX, which can be purchased in DVD format or as digital downloads.
How should I set up a projector for Halloween decorations?
To set up a projector for Halloween decorations, you should position it in a darkened room or outdoor area to ensure the images appear bright and dramatic. You may need to mount the projector on a tripod or find a suitable surface to project onto, such as a window or wall. Adjust the keystone to align the image properly.
Can I play sound effects or music alongside the projected images?
Yes, you can enhance the Halloween experience by playing sound effects or horror movie scores alongside the projected images. This can create a more terrifying and immersive atmosphere for your Halloween decorations.
What are some recommended projectors for Halloween use?
For Halloween use, portable projectors like the Epson PowerLite Cinema 500 or ViewSonic M1 are good options. These projectors offer features like auto-calibration, good brightness with over 2,000 lumens, rechargeable batteries for portability, and keystone adjustment to ensure proper alignment of the projected images.


